Crafts for children from aquarium leaves. Application of autumn leaves: owl, fish, cockerel and other ideas. Leaf applique: cockerel
Crafts from dry leaves - This is a great gift for friends, family and loved ones.
Working on such crafts is an interesting pastime and useful leisure time. Why useful? Yes, because by doing it, the child develops imagination, fantasy, learns to work with natural materials, studies colors, shapes and sizes. In addition, the baby develops hand coordination and.
And how interesting it is to choose beautiful leaves and flowers from the whole variety in order to dry them later. After all, sometimes you really want to preserve for a long time some masterpiece created by nature.
And kids love it very much
 watch how simple leaves turn into funny little animals, insects and birds.
How interesting it is to select leaves that are suitable in shape and color for various elements , for example, for the torso, head, legs, etc.
See how you can make fish from dry leaves.
Leaves of ash, birch and poplar are well suited for work.
In addition, to create an application you will need:
- glue;
- cardboard;
- scissors;
- felt-tip pens;
- a simple pencil;
- tweezers (they are very convenient for working with dried leaves).
Technology for making “Fish” appliques from dry leaves:
1. Draw an outline of the fish on thick cardboard.
2. Mark the place where the eye will be.
3.
Using white and black colored paper, cut out and glue an eye to the fish (you can draw it with felt-tip pens).
4. Draw a mouth for the fish.
5. Create a tail. To do this, you need to take two large dry leaves and glue them so that the bottom leaf slightly overlaps the top one.
6. Then, from two sheets of suitable shape, glue on the fins (on top and bottom of the fish).
7. Next you need to design the scales. To do this, select and set aside small leaves. And then, stepping back a little from the eye, stick on their first column, in order, from top to bottom. Each subsequent leaf should slightly cover the previous one.
8. Stepping lightly on the first row of scales, glue the second, and then the rest, until you have covered the entire fish with small leaves.
9. Stepping back a little from the eye, add another fin.

That's it, the first application is ready. Using this technique, you can also make a New Year’s “Fish” toy from dry leaves. To do this, you need to cut out the outline of the fish from cardboard and paste it with dry leaves according to the principle described above. To hang a fish on a Christmas tree, pierce a hole with a needle and thread a thread through it. This is an interesting New Year's toy that can be made from dry leaves. And most importantly, it will be safe for the child and made with your own hands.
If you have collected and dried larger leaves, then the fish can be made differently: instead of scales, choose one leaf that is suitable in shape, and decorate the tail, fins and mouth with interestingly selected colored leaves.

Children are easily captivated by something new and interesting. If your child is already bored with drawing or modeling, you can invite him to make crafts from bright autumn leaves. This process is extremely fascinating - amazing things are born from simple dried leaves with the help of glue, thread and other improvised devices. By taking up appliqué or making vases and bouquets, the child will not only be able to develop his creative skills and imagination, but also get to know the environment better. Collecting a herbarium for crafts together is an excellent opportunity to teach your child to distinguish between different tree species. So, what can you make from leaves?
Preparing leaves for crafts
To make any craft from leaves, you only need well-dried material; fresh leaves are not suitable. Preparing the leaves takes a long time, so you will have to be patient. In addition, the material needs to be dried correctly, here are the basic rules:
- If the evenness of the leaves is not important for the craft, they can be placed in a spacious container (for example, a large wicker basket) and left in the fresh air. This will allow the leaves to dry quickly and allow air circulation to prevent mold from developing.
- To get perfectly smooth leaves, you need to place them between book pages or album sheets under a press. Carefully place the material between the sheets of books or albums. It will take at least 14 days for the material to completely dry and be ready for use.
- If you don't want to wait a long time, you can use a special herbarium press. To do this, fold a stack of leaves, alternating each layer with newsprint or scrap sheets. In a few days, the material for the crafts will be ready.

How to Skeleton Leaves
Leaf skeletons, due to their lightness and transparency, look very impressive as decoration. To achieve this effect, you need to resort to a special technique - skeletonization.
What you will need:
- any fresh leaves;
- soda;
- egg dye;
- small container - ladle or pan;
- Toothbrush;
- paper napkins.

How to make skeletonized leaves:
- Mix soda and water in proportions of 1 to 4 and place the leaves in the prepared solution so that they are completely hidden by water.
- Bring the mixture to a boil and leave to simmer for 30 minutes.
- Remove the pan from the stove and remove the leaves, carefully placing them on the table with the glossy side up.
- Remove excess moisture using napkins.
- Clean the pulp from the leaf with a brush (this must be done very carefully, the leaves are quite fragile).
- Rinse the skeleton under water and then paint it the desired color.
- Leave the painted skeletonized leaves to dry.
The resulting material is ready for use.

Bouquet of flowers from leaves
A bouquet is the simplest thing that can be made from leaves, and it is worth starting with it if the child has not previously done such crafts. To make a craft in the form of a home bouquet, it is not necessary to use real flowers, dry them, etc. The buds can be made from multi-colored leaves collected on a walk. Involve children in every step of the process, creating a real creative workshop.
What you will need to make the craft:
- maple leaves (fresh) with stems;
- spool of strong thread.
To make a bud from maple leaves, you will need to perform several steps:
- First take one sheet and fold it with the glossy side out.
- Roll the leaf into a tube.
- Fold the next sheet in half and wrap it around the tube.
- Continue wrapping the leaves around the bud until the flower is quite full.
- Wrap a thread around the base of the bud to prevent the flower from falling apart.
Using this method, you can make any number of flowers, which are then simply collected into a bouquet.


Topiaries can be made from a variety of materials. You can often find crafts made from coffee, banknotes, sweets, hearts, etc. This version of topiary involves the use of maple leaves.
So, what is needed for topiary:
- pot;
- wooden stick for the trunk;
- a foam or foam ball as a base;
- gypsum;
- dye;
- hot glue;
- elements for decoration.
The procedure for creating an autumn topiary looks like this:
- The stick must be inserted into the pot and secured tightly with gypsum mortar. As a result, the structure will be strong and stable.
- Paint the pot and stick a color you like, such as gold to match the leaves.
- We attach a foam ball to the top of the stick - this is the future crown of the tree.
- Stick the required number of leaves into the ball. For decoration, you can use berry bunches, ribbons, beads, as well as artificial twigs and flowers. To make the leaf stems more durable, they must first be soaked in a hot solution of glycerin (1 to 2) and left in this form for 10 days in a dark, cool place .
- Next, we decorate the trunk and soil of the tree using dry moss, bark, and beads.


How to make a decorative autumn wreath
You can weave a beautiful wreath from bright autumn leaves to decorate windows, doors, walls, etc. A wreath attached to the front door will delight not only you, but also your guests.
What you will need for the craft:
- flexible branches of any tree;
- dried leaves of different colors (contrasting combinations, for example, yellow and red, look best);
- bunches of red berries (rowan, viburnum, etc.);
- physalis;
- glue;
- spool of strong threads;
- decorative metallized threads;
- small bird figurines for bouquets.
How to weave a wreath:
- The branches will serve as a frame - make a round or oval wreath out of them.
- For strength, secure the structure with thread in several places.
- Wrap the frame tightly with gold thread, leaving small branches free.
- Glue the leaves to the branches.
- Attach the berry clusters using thread.
- Glue or wrap physalis with threads.
- Finally, attach the birds to the wreath.
A finished craft made from leaves in the form of a wreath can be hung anywhere in the house; it will delight you with its beauty for a long time and remind you of the most colorful time of the year.


Beautiful autumn leaves can be used not only for simple children’s crafts, but also for complete interior decoration. One such product is a fruit bowl.
To make such a vase you need:
- glue and brush;
- inflatable ball;
- petrolatum;
- scissors;
- maple leaves.
Step-by-step instructions:
- Inflate the balloon to the size you need.
- Lubricate the surface of the ball with Vaseline, this is necessary so that the leaves do not stick to it during the process and are easily separated from it.
- Fix the ball in a stationary state, this will make it more convenient for you to make your vase.
- Glue maple leaves to the ball, having first generously coated them with glue.
- To make the vase strong enough, you will need several layers of maple leaves.
- As soon as the last layer is completed, carefully coat the product with glue again and leave for 3 days.
- Burst or deflate the balloon and remove any remaining residue from the product.
The original interior decoration is ready.


Photo frame in autumn style
Children love decorating the walls of their room with their drawings and favorite photographs. A craft made from leaves in the form of a frame is perfect to complement the design of the room. Help your child decorate a frame with autumn leaves, where he will then place his favorite photo.
For the craft you need:
- thick cardboard;
- glue;
- leaves you like;
- pencil;
- scissors.
How to make a frame:
- Cut a square or rectangular frame of the desired size from cardboard. The center of the frame where the photo will be placed needs to be cut slightly smaller than the size of the photo.
- To wrap a frame with leaves, first soak them in hot water, this will soften them and prevent them from tearing or breaking in the process.
- Glue the leaves onto the frame.
- Wait for the product to dry.
When the frame is ready, insert the photo into it, securing it with glue or tape.

Applications from autumn leaves
Appliques are one of the simplest types of crafts made from dried leaves. Using leaves of different shapes and sizes, you can create real pictures, which will then become a decoration for your home. You can make a whole series of panels united by a common theme. These can be animals, landscapes, etc. Next, several small master classes will be presented on making applications in the form of an owl, the Firebird, a fish and a lion.
Owl
To make an applique with an image of an owl, you will need:
- small leaves of brown tones (for this you can use oak, willow, birch);
- colored paper;
- a small twig of thuja;
- sheet of cardboard;
- a bunch of rowan berries;
- any tree branch;
- glue.
Before starting work, the leaves and berries must be dried. Once all the materials are ready, it’s time to move on to the most important thing:
- Cut out the outline of an owl from cardboard.
- Birch or oak leaves will represent the ears and paws of an owl; glue them in the right places.
- For feathers, use long, narrow willow leaves.
- Cut out eyes and beak from colored paper and glue them on.
- Glue your owl onto a tree branch, which will become a stand for the craft.
For additional decoration, you can use moss or thuja branches. You can also use rowan trees as owl paws. The product is ready.


Firebird
For the Firebird applique you will need:
- paper;
- leaves of linden, birch and rosehip;
- pumpkin seeds;
- thuja twigs.
And here's what the process itself looks like:
- A linden leaf is glued to the place where the bird's body will be.
- Birch leaf - head.
- Rosehip leaves are glued individually onto the tail.
- Whole sprigs of rose hips will serve as an additional decoration for the tail.
- Glue birch leaves to the body, these will be the wings.
- Eyes are made from pumpkin seeds, as well as decorations for the body and tail of the Firebird.
- The final stage is a tuft from a thuja twig or any other suitable plant.
The firebird is ready.

a lion
Children love different animals, so they will be especially interested in making one of their familiar animals.
What you will need for the lion cub:
- rounded yellow linden leaves;
- black felt-tip pen;
- ash seeds;
- horse chestnut (nuts);
- glue;
- small pine branch;
- scissors;
- a sheet of yellow paper;
- sheet of orange cardboard.
Having collected all the necessary materials, it’s time to start making crafts:
- Draw a lion's head on yellow paper or print the image on a printer and cut it out along the outline.
- For the mane, use linden leaves, gluing them around the head.
- Draw a nose for the lion and glue a chestnut in its place.
- Pine needles will be used for the mustache.
- The ash seed will represent a tongue.
As soon as the craft dries, it will be completely ready.

Fish
What child doesn't know about the goldfish that grants wishes? Making crafts with your own hands will be very entertaining for your child.
To make a fish craft you will need:
- dry leaves of quince and linden, brown and yellow in color, respectively;
- glue;
- marker;
- ash seeds;
- acorns;
- paper scissors;
- sheet of blue paper.
How to do:
- Draw the outline of the fish on blue paper and cut it out.
- Make scales from linden leaves and glue them to the body of the fish.
- Use brown quince leaves to decorate the tail.
- Using acorn caps, draw the outline of the fish’s head.
That's it, the real goldfish is ready.

Every autumn, colorful leaves delight the eye as they fall to the ground. This beauty quickly fades in the rain, turning the leaves into a solid brown mass. However, there is a way to preserve the beauty and brightness of autumn leaves - dry them or skeletonize them and use them to make various things from children's crafts to interior decorations. This activity will appeal to both children and adults.
75 photos of leaf craft ideas


Have you already collected and dried colorful leaves? Yes? Well done! And we also stocked up on a variety of foliage, three full large books - you remember, right? Now let's make crafts from autumn leaves!
Today I invite you to make with us an applique of leaves on a marine theme. Red and gold fish made from leaves will greatly enliven a cloudy autumn day, reminding you of sunny days, summer and the sea!
There are two options for your choice of applique from fish leaves: for kids - fish from whole leaves, and for older children the task is more difficult - Goldfish from leaves - scales!

We need:
- yellow and red dry leaves, similar in shape to the scales or body, fins and tail of a fish;
- PVA glue;
- colored cardboard (blue, cyan, green, violet, aquamarine - all sea colors);
- black felt-tip pen.
How to make leaf crafts for kids:
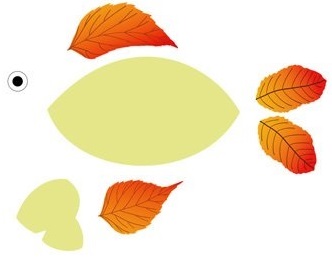
First, we’ll put the fish figures on cardboard without glue, just to see how it turns out and whether all the “spare parts” fit. Maybe the fin is too big, or the tail needs to be replaced with another, more suitable leaf.

If everything is in order, grease the leaves on the back side with glue (it’s more convenient to use glue with a brush) and carefully, so as not to smear the cardboard with glue, glue it to the base, forming the silhouette of a fish.

Let's wait until the leaves stick and draw lips and eyes for the fish with a felt-tip pen. Although you can do more elaborate work and cut out small details from the leaves - eyes from yellow ones, sponges from red ones, and also glue them on.

Another interesting and beautiful version of the Fish applique. Take a lot of birch leaves - they are amazingly golden! And several red oblong leaves for the tail and fins.

We assemble the applique by gluing leaf scales on top of each other according to the tile principle.

Lyubov Nemtsova
Tasks: Teach children to create plot compositions from natural materials - dried leaves; develop a sense of color and composition. To foster interest and respect for nature, to arouse a desire to preserve its beauty in arrangements and floral compositions.
This type of work can be offered to a child from 3-4 years old.
Let's collect beautiful ones in the park leaves and dry them in an old magazine or iron them between sheets of paper.

Take a close look at the dried leaves. Try to guess who is in them "hidden". And with the help of your imagination, turn it into various fish, animals, birds, etc.
For aquarium applications With the fish we also need blue cardboard, PVA glue, scissors and a few shells.

First we will collect aquarium with fish without glue. Let's choose oval leaf for the body, the ponytail can be made from various leaves(maple, willow, oak or others). Fins from leaves rosehip or birch.


Then we think about the bottom aquarium. There may be plants of various shapes, pebbles, shells that can be attached to plasticine.

A fish can release air from its mouth - this is also "small leaves» .

The application is ready! I wish you all creative success!
Publications on the topic:
Today I will try to make an autumn fan. The fan can be used for an autumn holiday and as a craft. For this we need:.
Application of autumn leaves is always a fascinating and creative process. And the collective application is especially important. In senior preschool.
Maple fantasies. Vase and roses from autumn leaves. Master class Necessary materials and tools: Maple leaves Airy.
Description: The work can be done with children of older preschool age. The material may be useful for preschool teachers.
Today I want to present to your attention a master class from autumn leaves “Outfit for Masha” Early autumn is a beautiful time - the time when.
Autumn is such a time of year. when you want to be creative. Some people write poetry, some people write music, artists paint pictures. And I collect it in the fall.
The golden time has come! Everything on the street turned golden-purple. The kids and I also decided to decorate our reception room with beautiful leaves. Now.
Walking through the autumn park and breathing fresh air, you can pick up a lot of fallen leaves of various sizes and colors. This is an amazing natural material for crafts! Bouquets, compositions of dried flowers, paintings and even an aquarium! Yes, leaves make bright and beautiful fish and plants. To create a man-made reservoir, you will also need other natural materials, namely shells, which can be collected near a river or sea. It is interesting when several techniques are combined in one work, for example, leaf applique and trimming, as in the proposed work. Let's get started!
We will need:
Cardboard box;
- leaves and twigs of evergreen trees;
- shells and pebbles;
- corrugated paper;
- ballpoint pen refill;
- cardboard;
- threads with a needle;
- glue;
- paints;
- scissors.

How to make a craft from leaves “Aquarium” with your own hands
For such a craft made from natural materials, a cookie box is suitable; you can buy it in stores that sell confectionery products. We paint the box blue and its lower part yellow.

Let's start making fish from leaves. It is easier to work with fresh, just collected leaves; they do not break and have a brighter and more juicy color. Dried leaves are not so bright and sometimes very brittle, so glue should be applied to them very carefully and carefully glued without pressing too hard, it is better to take a napkin and lightly press down the leaf with it. So, for the first fish we will need one round-shaped leaf for the body, 3 small leaves for the fins and 2 medium-sized leaves for the tail.

It is recommended to first place all the parts on the box in order to remember the places where they need to be glued; to be sure, it does not hurt to mark them with a pencil. So, we know the location, we glue two fins that will be under the body.

Glue a leaf-body on top of the fins. 
Glue the 3rd fin and one leaf-tail. 
Going a little onto the first leaf-tail, we glue the second part of the tail. 
Fish in nature come in different sizes and types. We will also select leaves of different sizes and shapes. If you can’t find something suitable, you can take a large leaf and cut out the required shape from it.

We experiment with the sizes and shapes of the tail and body. By making a small cutout, you can create an open mouth for the fish.

As you know, there are algae in any body of water. Let's start making them from corrugated paper, for which we cut it into squares measuring 1*1 cm. We take the used paste from the pen, insert it with the blunt end into the middle of the square and, as it were, hug the rod with paper, so we get a trim.

I like to use liquid nails when working with the trimming method, because they glue well and do not soak the paper. So, we take the rod with the trim, dip it in glue and place it on the cardboard, take out the rod, what remains is the trim. We make algae of any shape, preferably wavy.

Branches of evergreen trees (thuja, juniper, etc.) are well suited for algae, since they have a branched shape. Glue a few branches.

We collect all kinds of shells, pebbles, empty snail “houses” and glue them to the bottom of the box. We also glue twigs of thuja or juniper to some shells, so the algae will be at different levels.

Draw several fish of any shape on cardboard. 
We decorate them using the trimming method, then attach the resulting fish to the box using a thread and a needle. 
If there are (or can be made) octopuses or fish from beads, then we also place them on shells, this will enliven our aquarium, which we successfully made!

By the way, you can stick fragments of shells on the outside of the box, so the craft will look more original. I wish you creative success!


Irina Nagibina
Сhudesenka.ru